
Six tips for photographing landscapes with your phone
By Stuart Service, CNLA Media Coordinator
The most challenging part of landscape photography is figuring out how to translate what we see into a picture. It happens to me all the time; I walk through the forest taking a whole mess of photos, and then when I check them out later think to myself, “these just don’t show enough of what I saw.”
If you’re finding that photos of a client’s garden don't seem to show off the beauty of what you see, here are a few tips that might help troubleshoot through this dilemma. These are also the most common smartphone-photography hiccups I’ve come across when going through the collection of photos of the projects being considered for National Awards of Landscape Excellence.
Make sure your phone’s camera is on its best settings

A brand new cell phone out of the box is usually on its default, middle-of-the-road setting. This means the photos will be a size and quality that’s probably good enough to text to a friend. However, we’ve got award-winning ambitions, and a textable pic ain’t going to cut the mustard! We need to capture photos that are big and detailed enough to show off outstanding work to multiple judges. In the example above, I found the maxed-out settings of my phone when selecting the aspect ratio, 4:3 48MP (megapixels), resulting in photos with substantially better quality and a file size ten times bigger than the default settings. Every phone has its own technical personality to contend with, so what worked for me to max out the settings might not be the same for your phone. Go into your camera’s settings and make sure it’s set to the highest resolution available so that 100% of hardware is in use.
Clean the lens

If your pictures have similar, foggy lighting as above, there’s probably a fingerprint smudging up the lens. A quick wipe with your shirt is enough to remove fingerprints and grease. The fix to this problem doesn’t need to be fancy as smartphone camera lenses are built for wear and tear and are scratch resistant.
Is it the right time for pictures?


The picture on the left was taken midafternoon during a sunny day, creating dark shadows around much of the plant material. The picture on the right was taken during a cloudy day and, although the trees are still casting some shadows, the lighting is a lot more consistent throughout this landscape, improving visibility of all the plant material and hardscaping.
The best time for photos is when the sun is just peaking over the horizon in the early morning or late afternoon, or anytime during cloudy overcast conditions. During those three moments, the daylight is diffused, softer, and less likely to create a harsh, contrasty look. Taking pictures in the afternoon might lead to disappointing results as the sun is exceptionally bright, creating too dramatic a lighting difference between the shaded and full sun areas of the garden. Another tip, especially when taking photos of gardens with lots of blooming plant material, is to take the photos in mid-July to early August when most plants are their most established.
Compose the photo before taking it, and make minor crop adjustments to refine that composition

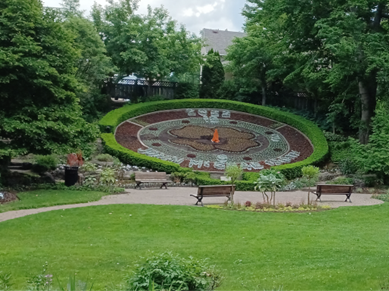
Think of every photo as though it’s a grid of nine rectangles. Whatever you consider to be the neatest part of the landscape – and in the case of the above photo at Riverside Park in Guelph, ON, I chose that circular garden in the back – make sure that focal point is located a little to the left or a little to the right of the picture. That’s the only factor I was really paying attention to when taking the above photo, and everything else just seemed to fall right into place, with the pathways and trees leading the viewer’s eye across the photo. I cropped the photo a little bit more to align the interlock path with the bottom-third of the image because I’m fussy like that. Take lots of pictures – try the same photo in different ways. Crouch down, get low to the ground to try a different vantage point, turning the focal point this time to be the complex interlock or a nice collection of shrubs in the foreground. Then try another angle by getting up onto a stepladder or walking up a hill to get high enough to see more of the landscape in the picture.
Don’t pinch your screen – zoom in with your feet!

A cell phone camera doesn’t have that same zoom capability as certain DSLR lenses or broadcast video cameras. By pinching out on your screen to zoom in, the picture is being stretched. The above photo would look a whole lot better had I just walked 30 feet closer, instead of zooming in from where I stood, stretching out the pixels, and turning this otherwise decently composed photograph into something distractingly grainy.
Tidy up the property

Make sure the garden is looking its best by removing weeds and dead foliage from both the plants and the lawn. It's always a joy when an animal wanders into the frame while taking landscape photos though, so Muffin, my parents’ Havanese puppy, hopefully stays right where she is after I clean up the debris.
A collection of quality landscape photos is the essential step to having spectacular work considered when applying to a provincial association’s annual awards program. No matter what kind of smartphone you have currently, the potential to take a nice landscape photo is less about hardware, than it is about being mindful of composition, lighting, and cleanliness of the area. With those factors in mind, and with a little bit of practice, you’ll be well on your way to putting the best foot forward when photographing your completed landscape projects.
Original print Summer 2022, Green for Life magazine